Recipients are contacts that cannot login to the application. They can potentially include the full directory. Enabling this integration removes the need to manually create or update recipients, or import them via CSV file.
Users are people who can login to the PackageX dashboard/application using SSO. These only include the directory users that are assigned the SAML 2.0 Application created in the Okta Admin Dashboard.
Before you proceed, it is important to understand that configuring Single Sign-On (SSO) is an essential prerequisite.
- Login to https://portal.packagex.io
- Navigate to Settings → SSO & Directory Integration on the PackageX Dashboard.
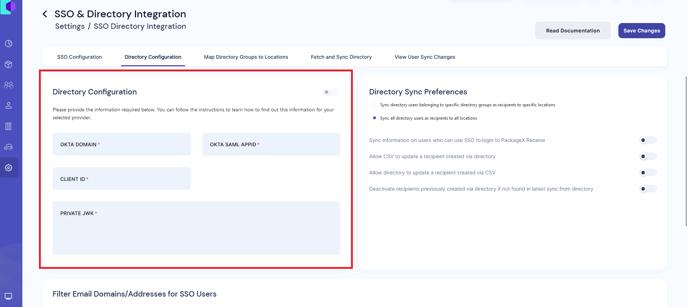
- You will be taken to the Directory Configuration
- Provide the required information.
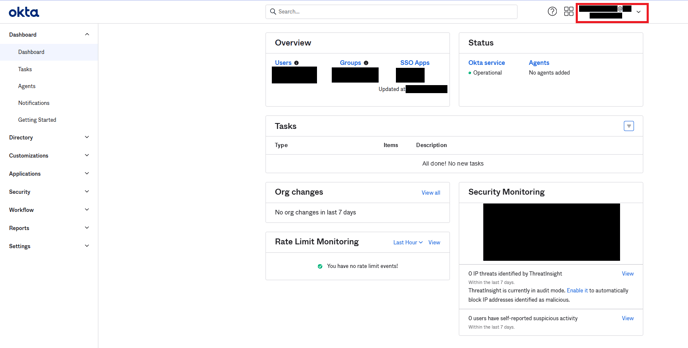
- Log in to your Okta Admin portal
- To find
OKTA DOMAIN- To find your Okta domain. Click your username in the Okta portal
- The Okta domain will be the value under your username/email

-
- Copy and paste it to OKTA DOMAIN field in PackageX Receive Portal.
OKTA SAML APPID- In the Okta Admin portal, navigate to Applications → Applications
- Select your SAML Application e.g.
portal.packagex.io - You need to get its application ID
- This can be extracted from the URL e.g. the URL will look like:
https://{yourOktaDomain}/admin/app/{someAppName}/instance/{SamlAppId}/#tab-{tabName}
(the values within the curly braces {} are your specific values → we need forSAMl APPID)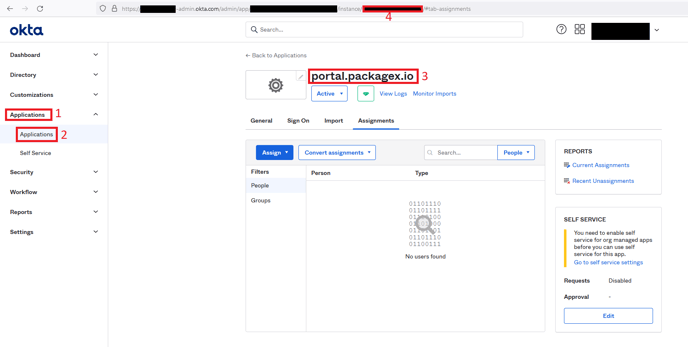
Copy the SAMl APPID part and paste this into the OKTA SAML APPID field in PackageX Receive Dashboard.
- Navigate to Applications → Applications
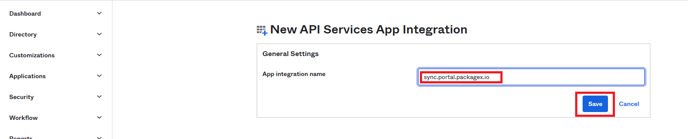
- Click “Create App Integration”, select “API Services” and click “Next”
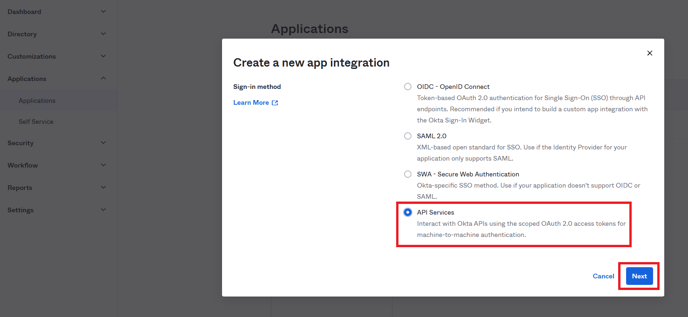
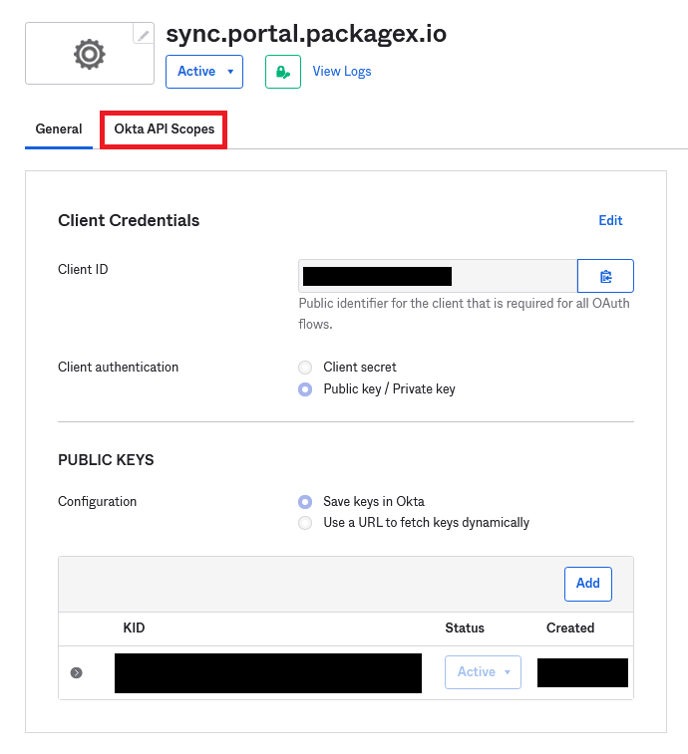
- In General Settings, add “App integration name” e.g. sync.portal.packagex.io and click “Save”.
- You will be taken to the General tab of the app.
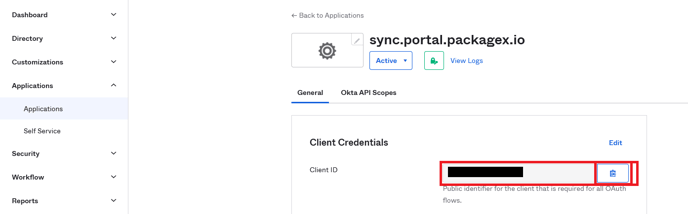
- Copy the Client ID and add it to CLIENT ID field in the PackageX Receive Dashboard.
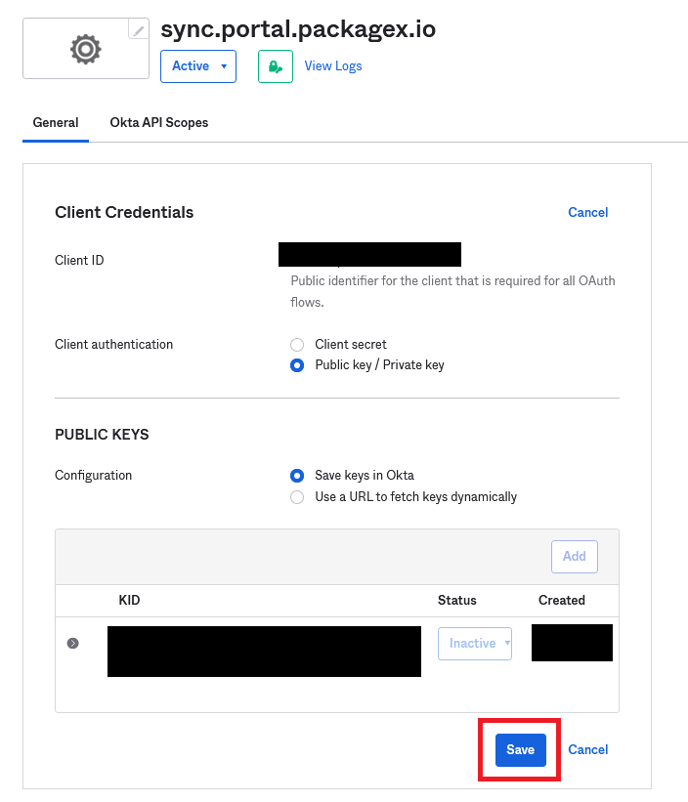
- Click Edit button in the Client Credentials Section.
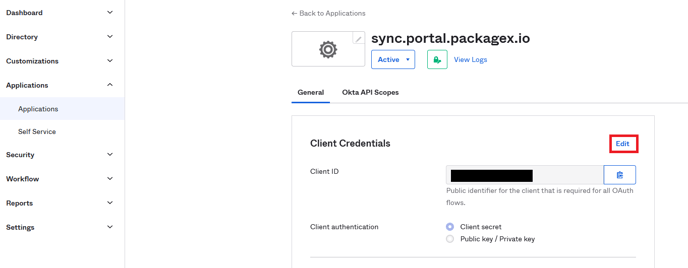
- For "Client authentication”, select Public key/Private key and then Click “Add key” in the Public Keys section.
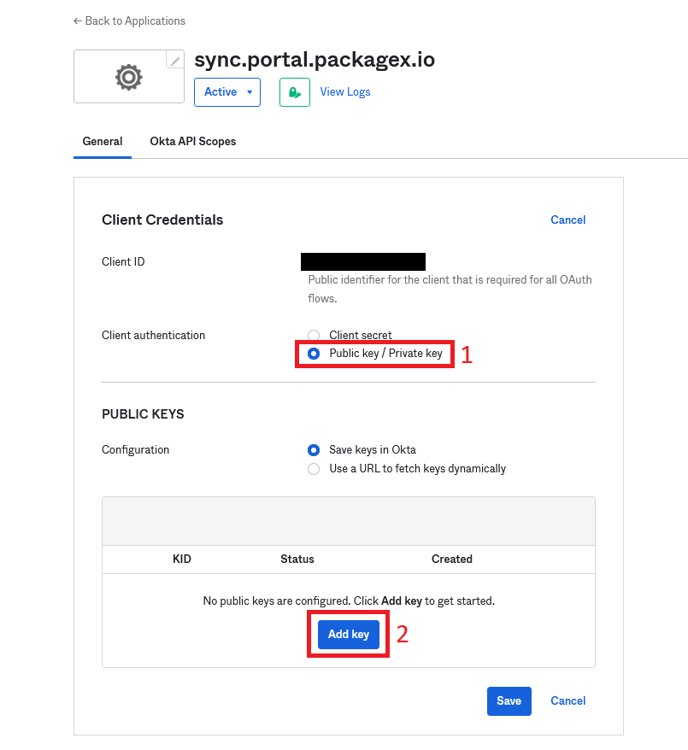
- Click “Generate new key” and copy the “Private key”
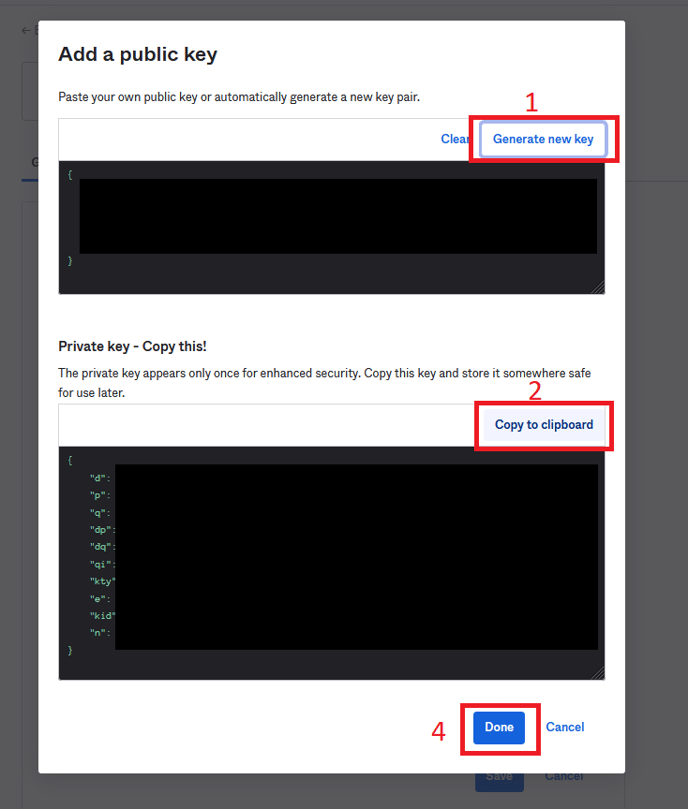
- Add it to PRIVATE JWK field in the PackageX Receive Dashboard.
- Back in the Okta portal, click “Done” in the “Add a public key” popup (see the last image of the Okta portal). Then click “Save”.
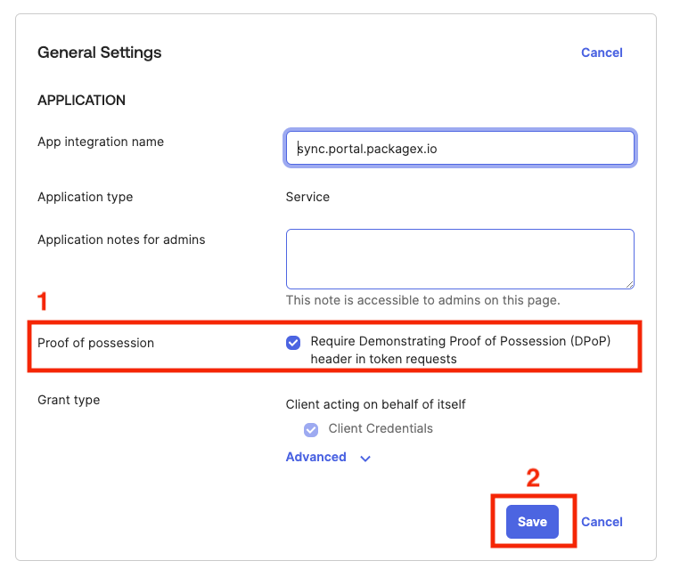
- After saving that scroll down for the “General Settings” and click on the “Edit”.
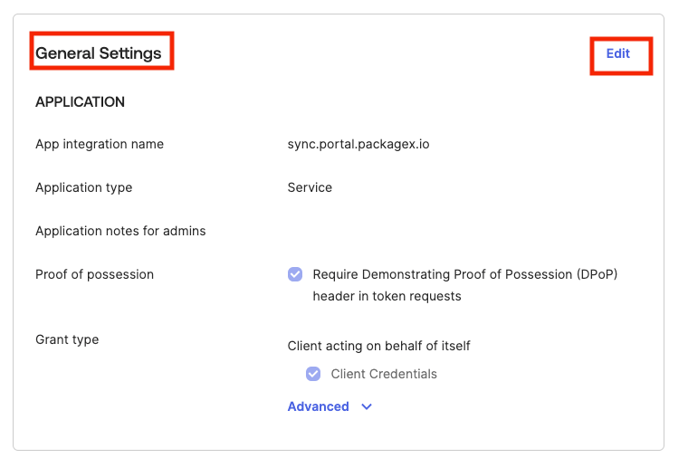
- Uncheck the “Proof of possession” from the general settings and click on the save button.
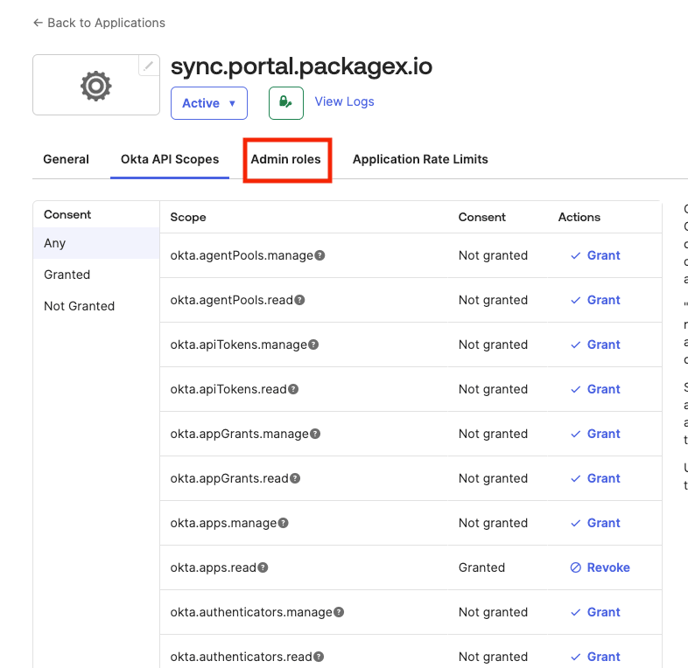
- Click the “Okta API Scopes” tab.
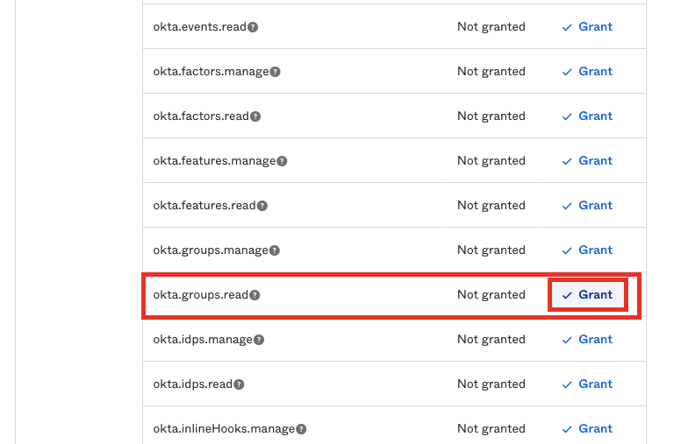
For syncing Recipients only, the following permissions are required
-
- okta.groups.read
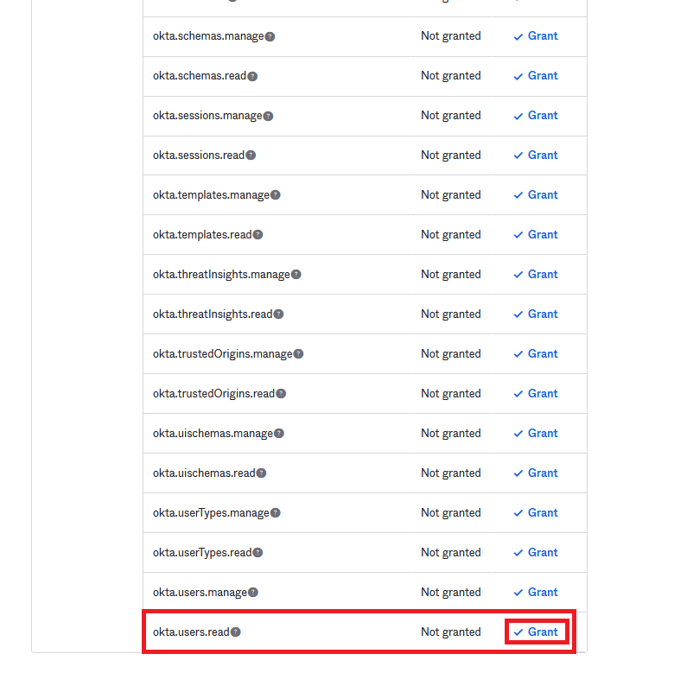
- okta.users.read
For syncing Users in addition to the two permissions above, the following is required
-
-
okta.apps.read
-
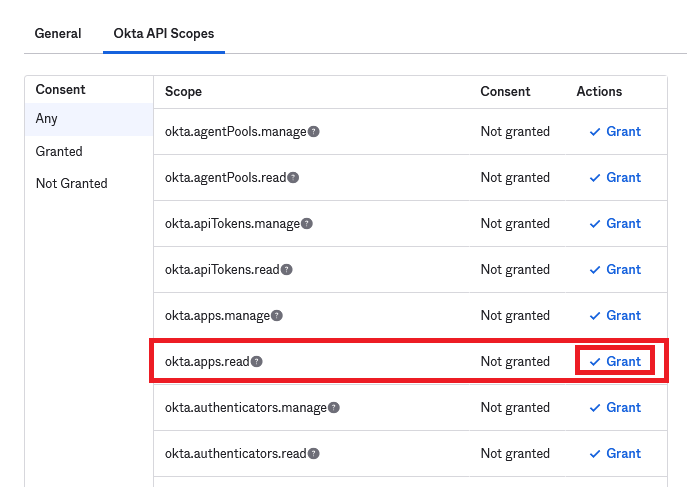
- You need to “Grant” (and then “Grant Access” in the popup if it appears) to each permission
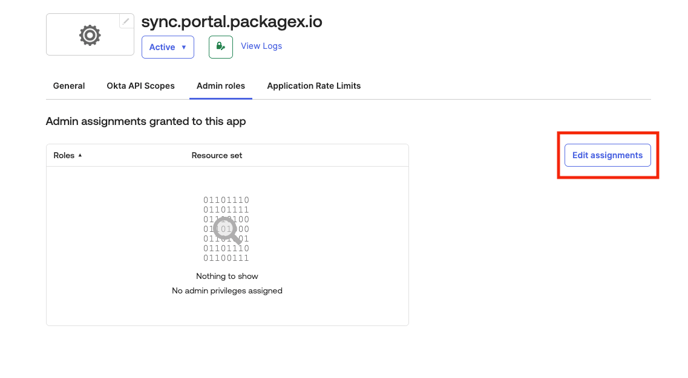
- After granting the API Scopes Click on the “Admin Roles” Tab.
- Click on the “Edit assignments” button.
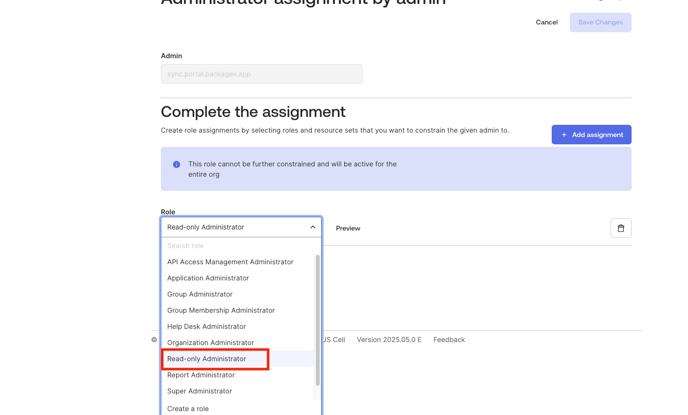
- Click on the “Role” drop down and select “Read-only Administrator” from the list and and click on the save changes button.

- Configure your sync preferences
.png?width=688&height=310&name=Screenshot%202023-01-19%20190244%20(1).png)
- Sync a subset of directory v sync full directory as Recipients
- You can choose to
Sync directory users belonging to specific directory groups as recipients to specific locations:- This option will require you to create (Contact) Groups in your directory, assign directory users to those groups, and then map those (Contact) Groups to PackageX Receive locations (more on this later)
- This option is good if you need segregation and want control of where recipients are created and also do not want your full directory to be replicated
- Or you can choose to
Sync all directory users as recipients to all locations- The second option simply replicates all the directory users to all PackageX Receive locations
- E.g. if there are 10,000 users in your directory and you have 10 locations in PackageX Receive, all 10,000 directory users will be created as recipients on all locations i.e. a total of 100,000 recipients
- Good if you do not have many locations or you want a simpler sync process
- Not good if your directory has a lot of users
- Not good if a specific user (Recipient) in your directory should only be mapped to specific location
- You can choose to
Sync information on users who can use SSO to login to PackageX Receive- Requires the Application.Read.All Graph API permission
- Enables a view where you can see which directory users can use SSO to login in PackageX Receive (i.e. the directory users assigned to the SSO application), and easily create those Users in the PackageX Receive without manually adding information
- Does not automatically create Users, that is still a manual process as it require role selection etc
Allow CSV to update a recipient created via directoryAllow directory to update a recipient created via CSVDeactivate recipients not found in directory/Deactivate recipients previously created via directory if not found in latest sync from directory- Optionally configure ****Email Domain/Address filtering for SSO Users
.png?width=688&height=308&name=Screenshot%202023-01-19%20190611%20(1).png)
- Click “Save Changes” in the top right once you are satisfied with your preferences
.png?width=688&height=291&name=Screenshot%202023-01-19%20190729%20(1).png)
- If the information provided is correct, directory will be integrated and toggle will turn to on
- If the information provided is incorrect, you will be provided with an error message. E.g. you may be missing some required API scope, or the credentials and/or different Okta IDs added were invalid or mixed up
- You may choose to remove directory integration at any time be toggling it off
- To turn it back on again, you will need to re-enter the information required
- Removing SSO integration automatically removes the directory integration